Electrical Wiring for Home Saunas: A Comprehensive Guide
When embarking on the journey of installing a home sauna, understanding the electrical wiring requirements is crucial for both safety and functionality. This article provides a detailed guide to electrical wiring for home saunas, ensuring you can enjoy the warmth and benefits of your sauna without any hitches.
Key Takeaways
| Key Point | Description |
|---|---|
| Safety First | Adhering to electrical safety standards is paramount. |
| Professional Help | Consider hiring a licensed electrician for installation. |
| Correct Specifications | Use the right wire size and circuit breaker. |
| GFCI Protection | Install a GFCI breaker for moisture-rich sauna environments. |
| Ventilation | Ensure proper ventilation to prevent electrical hazards. |
Understanding Sauna Electrical Requirements
Home saunas, especially those powered by electric heaters, require specific electrical installations. Here's a breakdown of the key components:
- Circuit Breaker: A dedicated circuit is essential to prevent overloading. Saunas typically require a 220-240 volt circuit with a capacity that matches the heater's power requirements.
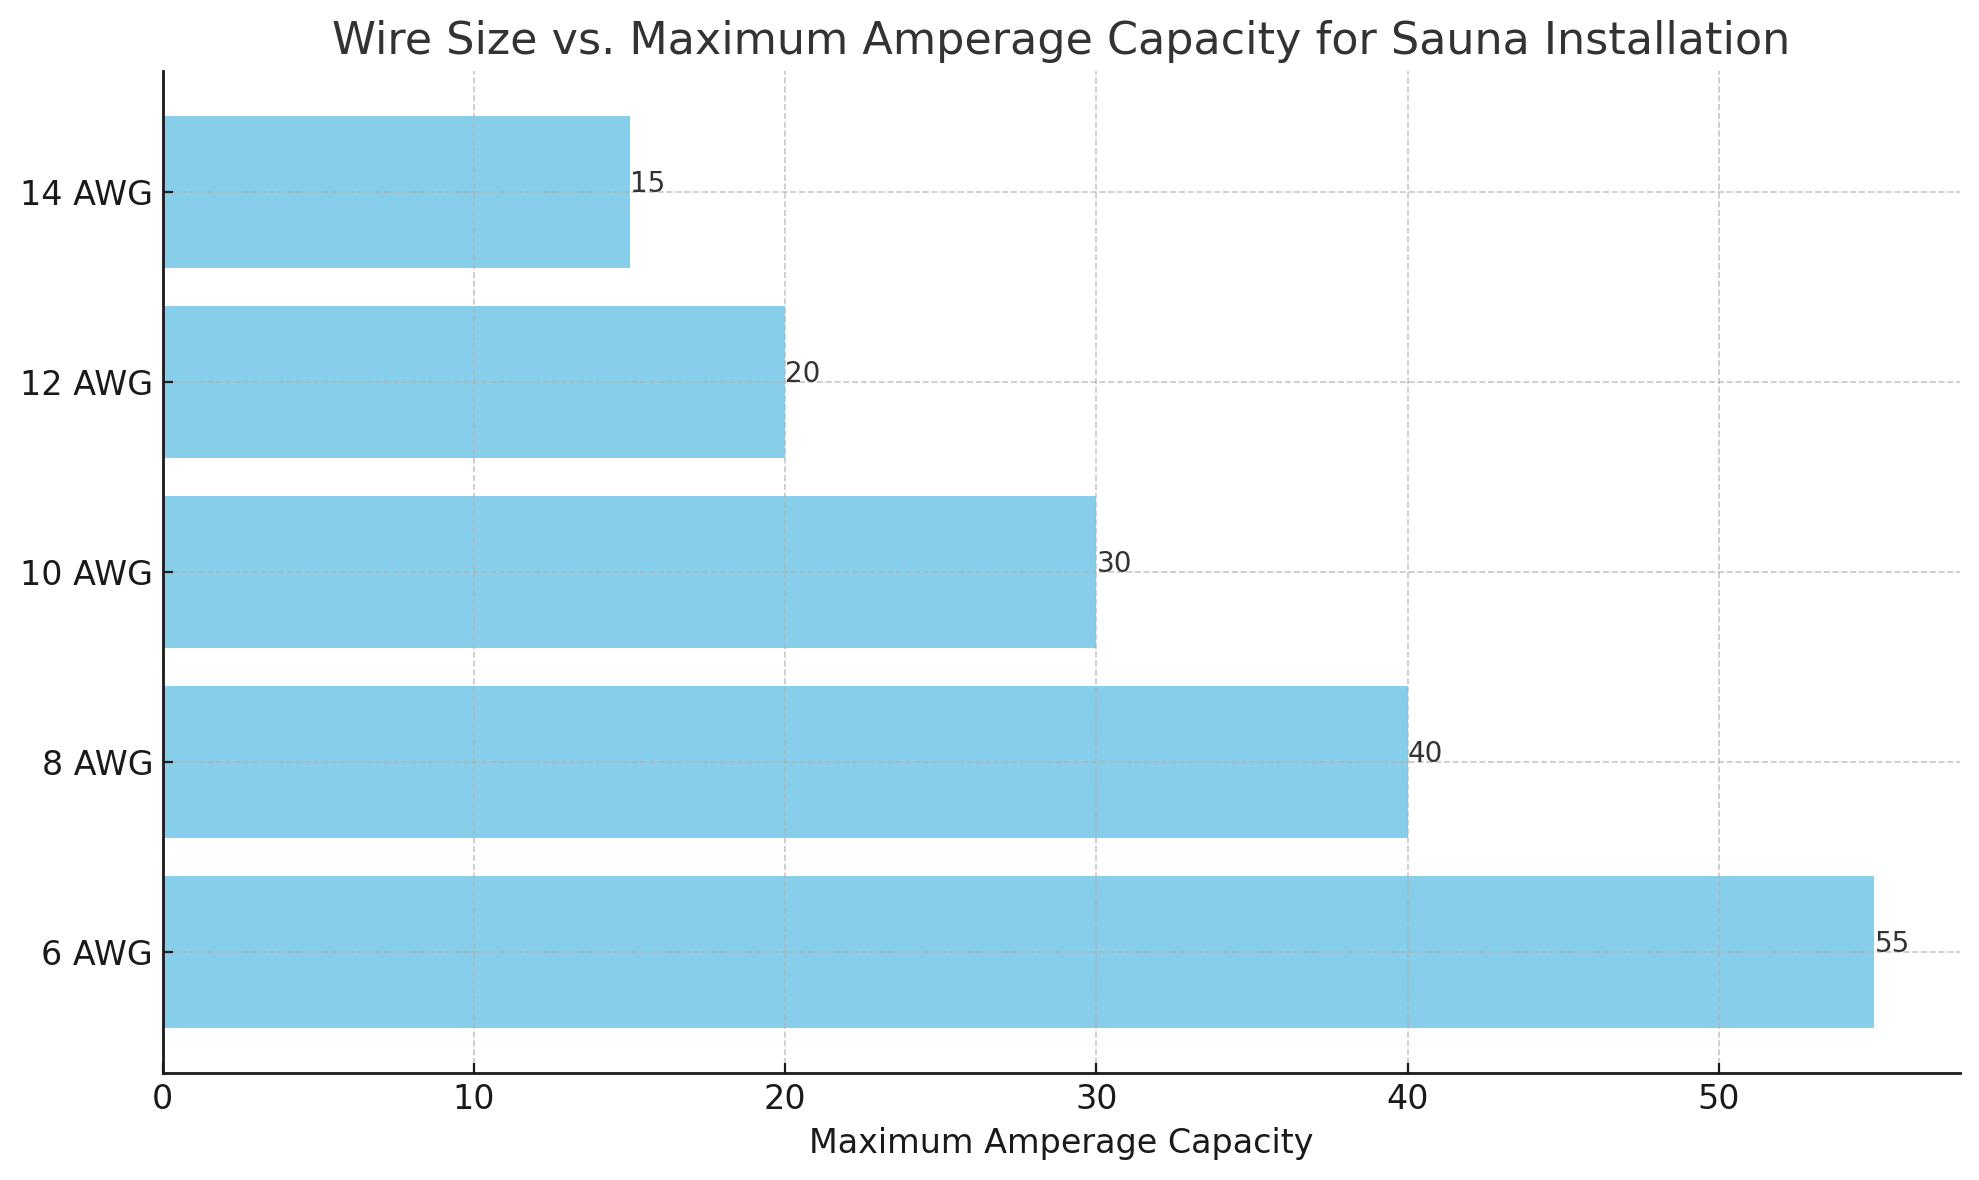
- Wire Size: The wire size must be appropriate for the sauna's amperage draw, usually ranging from 30 to 60 amps. This ensures efficient and safe power delivery.
- GFCI Protection: Given the sauna's wet conditions, a Ground Fault Circuit Interrupter (GFCI) breaker is a must for preventing electrical shocks.
- Outlet and Switch Placement: Outlets and switches should be placed outside the sauna room to reduce exposure to high humidity levels.
Planning and Installation Steps
- Assess Your Sauna's Power Needs: Consult the manufacturer's specifications for your sauna's power requirements.
- Obtain Necessary Permits: Before starting, check local building codes and obtain any required permits. This step is crucial for ensuring compliance and safety.
- Choose the Right Location: Consider both the sauna's placement and where to run electrical wiring. Accessibility for maintenance and ventilation needs should be considered.
- Install a Dedicated Circuit: This circuit should only serve the sauna, preventing electrical overloads and potential hazards.
- Wire Installation: Use the appropriate wire size for your sauna's amperage. Typically, a larger gauge wire is required for higher amperage.
- Install a GFCI Breaker: This is a critical safety measure for any sauna installation.
- Test the Installation: Before using the sauna, thoroughly test the electrical installation to ensure everything is functioning correctly.
Safety Considerations
Safety cannot be overstressed when dealing with electrical installations for home saunas. Follow these guidelines to ensure a safe sauna experience:
- Hire a Professional: Considering the complexities and dangers associated with electrical work, hiring a licensed electrician is recommended.
- Adhere to Safety Standards: Ensure all installations comply with national and local electrical codes to mitigate the risk of fire and electrical hazards.
- Regular Maintenance: Regular checks and maintenance are essential for ensuring the long-term safety and functionality of your sauna's electrical system.

Conclusion
Electrical wiring for home saunas requires careful planning, adherence to safety standards, and, often, the expertise of a professional. By understanding and following these guidelines, you can ensure that your sauna is a safe, relaxing retreat in your home.
Remember, while DIY projects can be rewarding, the installation of electrical components for your sauna often necessitates professional knowledge and experience, particularly to comply with safety regulations and ensure optimal operation.


